Photo Booth Frame Ideas and Design Guide for 2026
Pixilated Photo BoothThe photobooth frame has evolved from a simple border decoration to a critical element of event photography that influences guest engagement, brand recognition, and social media shareability. Whether you're planning a corporate event, wedding celebration, or brand activation, the frame surrounding each photo serves as both a creative canvas and a functional tool that reinforces your event's identity. Understanding how to design, implement, and optimize these frames can dramatically improve the quality of guest experiences and the lasting impact of your event photography.
Understanding the Strategic Value of Photobooth Frames
A well-designed photobooth frame accomplishes multiple objectives simultaneously. It creates visual consistency across all event photos, reinforces branding or theme elements, and provides context that makes photos more meaningful when shared weeks or months after the event concludes.
Modern frames serve several key purposes:
- Creating instant brand recognition through logo placement and color schemes
- Establishing thematic consistency that ties into broader event design
- Providing date, location, or hashtag information for social media tracking
- Enhancing perceived photo quality through professional presentation
- Encouraging social sharing by making images inherently shareable
The strategic placement of design elements within your photobooth frame directly impacts how guests perceive and share their photos. According to professional photo booth frame design principles, contrast, subtle branding, and proper proportions attract more engagement and create memorable keepsakes.
Frame Design Fundamentals
Creating an effective photobooth frame requires balancing aesthetic appeal with practical functionality. The frame must complement photos rather than overwhelm them, while still communicating essential information.
| Design Element | Purpose | Best Practice |
|---|---|---|
| Border Width | Frame definition | 10-15% of total image area |
| Text Placement | Information delivery | Bottom third or corners only |
| Color Palette | Theme reinforcement | 2-3 coordinating colors maximum |
| Logo Size | Brand presence | Subtle, non-distracting scale |
Typography selection significantly influences frame readability and aesthetic quality. Choose fonts that remain legible at small sizes while reflecting your event's personality. Script fonts work beautifully for weddings and elegant celebrations, while bold sans-serif options suit corporate events and brand activations.
Popular Photobooth Frame Styles and Themes
Different events demand different frame approaches. Understanding the various style categories helps you select or design frames that perfectly match your occasion's atmosphere and objectives.
Classic and Timeless Options
Polaroid-style frames remain perpetually popular because they evoke nostalgia while providing a clean, recognizable format. These frames mimic the iconic instant camera aesthetic, complete with the characteristic wide bottom border perfect for handwritten notes or printed captions. The creation of Polaroid-style photo booth frames offers a personalized touch that guests appreciate.
Vintage-inspired frames incorporate ornate borders, sepia tones, and classic typography that transport viewers to earlier eras. These designs work exceptionally well for anniversary celebrations, retro-themed parties, and events held in historic venues.
Modern and Minimalist Approaches
Contemporary frame design often embraces negative space and geometric simplicity. Clean lines, ample white space, and strategic placement of minimal text create sophisticated results that don't distract from the photo subjects themselves.
Social media-themed frames mimic popular platform interfaces, complete with like buttons, comment sections, and follower counts. These playful designs encourage immediate sharing and resonate strongly with younger audiences familiar with digital platforms.
- Instagram-style frames with profile pictures and engagement metrics
- Twitter-inspired layouts with tweet-style captions
- TikTok-themed designs featuring vertical formats and trending hashtags
- Snapchat-style filters with playful overlays and geotags
DIY Photobooth Frame Creation
Building your own physical photobooth frame offers complete creative control while managing budget constraints. The step-by-step process for creating DIY photo booth frames makes this approach accessible even for those without extensive crafting experience.
Materials and Tools Required
Essential supplies for frame construction:
- Foam core board or sturdy cardboard (32" x 40" minimum)
- Craft knife or box cutter with fresh blades
- Metal straightedge or T-square for precise cuts
- Decorative paper, fabric, or paint for finishing
- Strong adhesive (hot glue gun or craft glue)
- Measuring tape and pencil for layout planning
The complete tutorial for making party photo booth frames provides detailed instructions for assembly and decoration techniques.
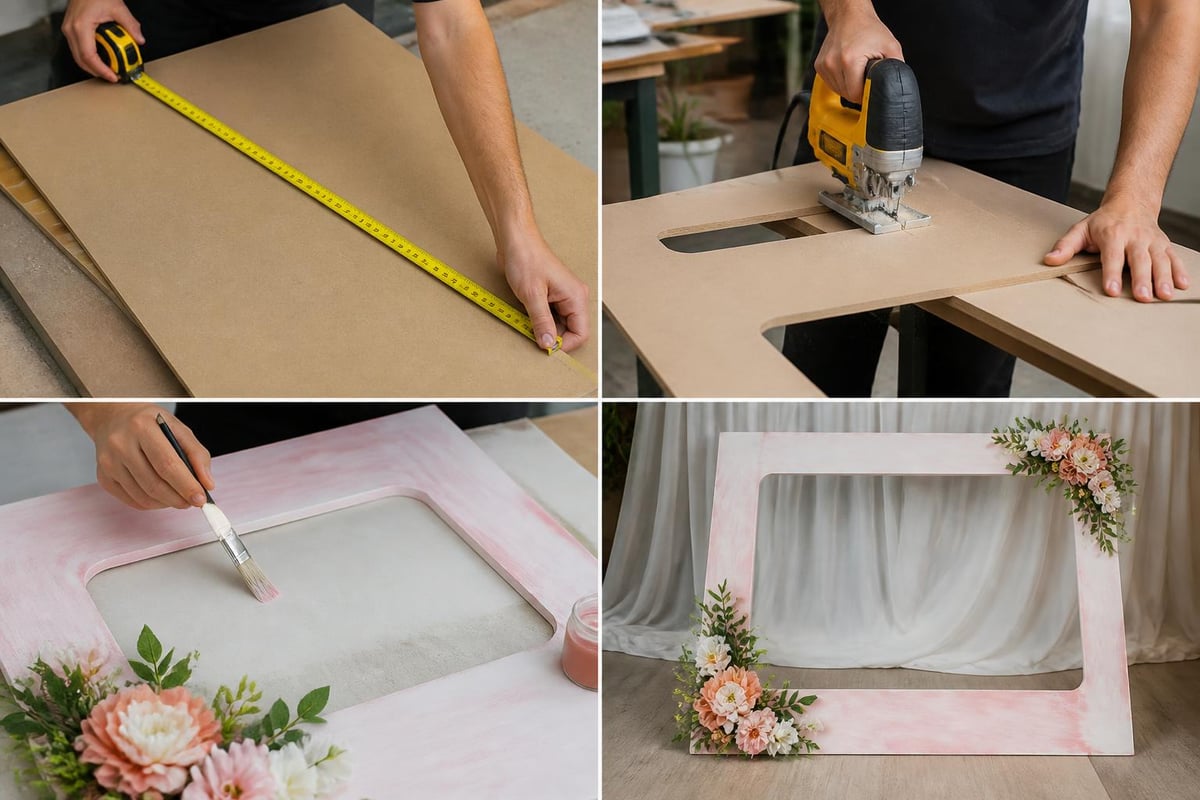
Construction Process
Begin by measuring and marking your frame dimensions. Standard openings measure approximately 24" x 18" to accommodate groups of 3-5 people comfortably. Maintain at least 4-6 inches of border on all sides to create adequate framing without overwhelming the composition.
Cut your opening carefully using multiple light passes rather than attempting to slice through in one motion. This approach produces cleaner edges and reduces the risk of tearing or uneven cuts.
Decoration transforms basic construction into event-specific artistry. Consider these finishing options based on your theme and skill level.
| Decoration Method | Difficulty | Best For |
|---|---|---|
| Wrapping paper coverage | Easy | Holiday events, birthday parties |
| Fabric draping | Moderate | Elegant weddings, formal events |
| Floral attachments | Moderate | Garden parties, spring celebrations |
| Chalkboard paint | Easy | Rustic themes, customizable messaging |
Digital Frame Design and Customization
While physical frames create interactive props for guests to hold, digital photobooth frame overlays offer unlimited creative possibilities without material costs or storage requirements. These digital designs get embedded directly into each photo, creating polished results instantly.
Design Software and Tools
Professional frame design typically utilizes Adobe Photoshop or Illustrator, but accessible alternatives include Canva, PicMonkey, and GIMP. These platforms provide templates and tools specifically designed for photo overlay creation.
When designing digital frames, work at high resolution (300 DPI minimum) to ensure crisp output across various sharing platforms and print sizes. Create your canvas at the final output dimensions your photo booth system requires, typically ranging from 1800 x 1200 pixels to 2400 x 1600 pixels depending on equipment specifications.
Key technical considerations:
- Maintain transparent backgrounds for overlay flexibility
- Save in PNG format to preserve transparency
- Test frames with various background colors and lighting conditions
- Ensure text remains readable at social media thumbnail sizes
- Consider both landscape and portrait orientations
For events requiring professional branding, customized design services enable precise brand alignment. The Customized Design - Add Logo or Text service allows businesses and event planners to incorporate specific logos, monograms, or branded elements directly into their photobooth frame, ensuring consistent brand presence across every photo captured at the event.

Color Psychology and Brand Alignment
Color selection within your photobooth frame influences emotional responses and brand recognition. Corporate events should mirror official brand colors exactly, using hex codes or Pantone references to maintain consistency.
Weddings benefit from coordinating frame colors with overall wedding palettes. If the ceremony features blush pink and gold accents, incorporating these hues into the frame creates visual cohesion across all event elements.
Creative Frame Ideas for Different Event Types
Each event category presents unique opportunities for frame customization that enhances the overall experience and creates appropriate keepsakes.
Wedding Celebrations
Wedding photobooth frames should balance elegance with personality. Include the couple's names and wedding date as essential information guests will appreciate when revisiting photos years later. Monograms create sophisticated focal points, while romantic quotes or meaningful song lyrics add personal touches.
Wedding photo booth rental services often provide themed frame options that coordinate with popular wedding styles from classic formal to rustic barn celebrations.
Effective wedding frame elements:
- Couple's names in elegant typography
- Wedding date and location
- Custom monogram or logo design
- Romantic quote or hashtag
- Coordinating colors from wedding palette
Corporate Events and Brand Activations
Corporate photobooth frames function as mobile marketing tools that extend brand reach through social sharing. Each photo becomes a branded asset when designed strategically.
Position company logos prominently but tastefully, typically in corners or along borders where they won't obscure faces. Include event-specific hashtags to facilitate social media tracking and encourage attendee engagement.
Corporate event photo booth solutions support brand-building objectives while creating memorable experiences for employees, clients, and partners.
Birthday Parties and Social Gatherings
Birthday frames embrace playful creativity with bright colors, fun fonts, and age-specific themes. Children's parties might feature cartoon characters or favorite colors, while milestone birthdays (30th, 40th, 50th) often incorporate humor and sophisticated design elements.
Include the honoree's name, age, and celebration date to create personalized keepsakes guests will treasure. Consider inside jokes, favorite quotes, or meaningful references that resonate with the birthday celebrant and close friends.
Technical Implementation and Quality Considerations
Successful photobooth frame execution requires understanding both design principles and technical specifications. Poor implementation can undermine even the most creative designs.
Resolution and File Format Standards
Digital frames must maintain quality across various output scenarios. Working files should exceed final requirements, typically starting at 3000 x 2000 pixels for standard photo booth applications. This buffer ensures sharp reproduction even when photos get enlarged or cropped.
File format recommendations:
- PNG with transparency for overlay frames
- JPEG for full-background designs
- Vector formats (AI, EPS) for maximum scalability
- Separate files for different orientations (landscape/portrait)
Testing and Refinement
Before deploying frames at actual events, conduct thorough testing with diverse subjects and lighting conditions. Photograph individuals, couples, and larger groups to verify the frame accommodates different compositions appropriately.
Review test photos on multiple devices (phones, tablets, computers) to confirm readability and visual appeal across platforms. Text that appears crisp on a computer screen might become illegible when viewed as a thumbnail on mobile devices.
The guide to boosting guest fun and photo quality emphasizes how proper frame implementation enhances overall event engagement and satisfaction.
Frame Placement and Composition Guidelines
Strategic design placement within photobooth frames ensures critical elements remain visible while subjects occupy center stage. Understanding standard framing conventions prevents important information from getting cropped or hidden.
Safe Zone Planning
Establish safe zones where no critical content appears. Photo booth users don't always position themselves perfectly centered, so important text or logos placed too close to edges risk getting cut off or obscured by subjects.
Recommended safe zone margins:
- Top: 8-10% from edge for headers or logos
- Bottom: 10-15% for event details and dates
- Sides: 5-8% for vertical text or decorative elements
- Center 60%: Reserved primarily for subjects
This conservative approach ensures consistency even when guests stand off-center or lean into the frame from unusual angles.
Visual Balance and Symmetry
Well-designed frames guide viewer attention naturally from frame elements to photo subjects without creating visual conflict. Symmetrical designs with matching left and right elements create formal, balanced compositions appropriate for professional events.
Asymmetrical layouts offer more dynamic, contemporary feels but require careful weight distribution. If placing a large logo in one corner, balance it with text or decorative elements in the opposite area.
Seasonal and Holiday Frame Adaptations
Seasonal events provide excellent opportunities for themed photobooth frames that capture specific celebrations and time periods. These temporary designs create timely keepsakes while demonstrating creativity and attention to current occasions.
Holiday-Specific Designs
Winter holiday frames might incorporate snowflakes, evergreen branches, or festive color schemes of red and green. The DIY holiday photo booth frame tutorial demonstrates using wrapping paper and simple materials to create festive physical frames.
Halloween frames embrace bold oranges and blacks with playful spooky elements, while graduation celebrations call for school colors, diplomas, and cap-and-gown imagery.
Adapting Base Designs for Multiple Seasons
Efficient frame design involves creating flexible templates that accommodate seasonal swaps without complete redesigns. Develop a core layout structure with designated areas for seasonal graphics that can be easily updated.
This modular approach reduces design time while maintaining brand consistency across multiple events throughout the year. Simply swap seasonal graphics while preserving core elements like logos, fonts, and layout structure.
Maximizing Social Media Impact
Photobooth frames designed with social sharing in mind generate significantly more online engagement and extended brand exposure. Strategic design choices encourage guests to post photos immediately and tag relevant accounts.
Hashtag Integration
Including event-specific hashtags directly within frames dramatically increases proper hashtag usage. Rather than expecting guests to remember and manually type hashtags, embedding them in the frame makes tagging effortless.
Position hashtags prominently but not intrusively, typically along the bottom border where they're clearly visible without distracting from subjects. Use clean, readable fonts that remain legible even when photos get compressed for social media platforms.
Hashtag best practices:
- Keep hashtags short and memorable (under 20 characters)
- Create unique tags specific to your event
- Include year for annual events (#CompanyName2026)
- Test searchability before finalizing
- Consider multiple hashtags for different purposes (event name, theme, location)
Platform-Specific Optimization
Different social platforms favor different image dimensions and aspect ratios. Instagram prefers square (1:1) or vertical (4:5) formats, while Facebook and Twitter accommodate landscape orientations better.
Consider creating multiple frame versions optimized for different platforms, or design flexible frames that work across various aspect ratios. This approach maximizes visual impact regardless of where guests choose to share.
Understanding photo booth rental cost considerations helps event planners budget appropriately while ensuring access to customization features that support social media optimization.
Professional vs. DIY Frame Decisions
Event organizers face important decisions regarding frame creation approaches. Both professional design services and DIY methods offer distinct advantages depending on specific circumstances.
When to Choose Professional Design
Complex branding requirements, large-scale corporate events, and situations requiring multiple frame variations justify professional design investment. Experienced designers understand technical specifications, brand guidelines, and visual principles that create polished results.
Professional services also save significant time for busy event planners managing multiple logistical elements simultaneously. Rather than learning design software and troubleshooting technical issues, outsourcing frame creation frees time for other critical planning tasks.
DIY Frame Advantages
Smaller events, tight budgets, and situations requiring frequent minor adjustments make DIY frame creation appealing. Basic designs with simple text and minimal graphics require only modest design skills and readily available tools.
Personal events like birthday parties and family reunions benefit from the personal touch that comes with handcrafted elements. The four simple framing ideas for photo booth pictures demonstrate accessible approaches for non-designers.
| Approach | Best For | Typical Cost | Time Investment |
|---|---|---|---|
| Professional Design | Corporate events, weddings, brand activations | $150-$500 | 1-2 hours coordination |
| DIY Digital | Small events, personal celebrations | $0-$50 (software) | 3-6 hours learning/creating |
| DIY Physical | Interactive displays, budget events | $20-$75 (materials) | 4-8 hours construction |
| Hybrid (Template + Customization) | Mid-size events, repeated themes | $25-$150 | 1-3 hours customization |
Measuring Frame Effectiveness
Tracking frame performance helps optimize future designs and demonstrate value from event photography investments. Several metrics indicate whether frames successfully achieve their objectives.
Engagement Metrics
Monitor social media posts featuring your photobooth frame through hashtag tracking and mention notifications. High posting volumes indicate guests found frames worthy of sharing, while limited activity might suggest design improvements needed.
Compare engagement rates (likes, comments, shares) between posts featuring framed photos versus unframed images. Effective frames should enhance rather than diminish engagement.
Key performance indicators:
- Total social media posts featuring event hashtag
- Average engagement rate per post
- Reach and impressions generated
- Photo booth usage volume during event
- Guest feedback and testimonials
Qualitative Assessment
Beyond numerical metrics, gather qualitative feedback about frame designs. Event attendees provide valuable insights about what resonated and what could improve.
Post-event surveys can include specific questions about photo booth experiences and frame preferences. This feedback informs future design decisions and helps identify emerging trends worth incorporating.
Creating effective photobooth frames requires balancing aesthetic creativity with technical precision and strategic thinking. Whether designing digital overlays or constructing physical props, thoughtful frame development elevates event photography from simple snapshots to valuable keepsakes and shareable brand assets. Pixilated Photo Booth delivers professional-grade DIY photo booth rentals with comprehensive customization options, making it easy to create perfectly framed event memories that guests will cherish and share long after your celebration concludes.