Pixilated Photo Booth Setup Video for Pro 18MP Camera
Nicolas ChinaThis tutorial video is for the Pro 18MP camera version of our Photo Booth Rental.
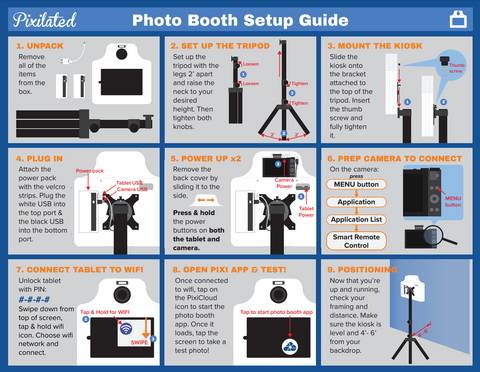
Step-by-step instructions for how to set up your Pixilated photo booth kiosk.
Photo Booth Setup Instructions
- Unpack - Remove all of the items from the box.
- Set up the tripod - Set up the tripod with the legs 2' apart and raise the neck to your desired height. Then tighten both knobs.
- Mount the kiosk - Slide the kiosk onto the bracket attached to the top of the tripod. Insert the thumb screw and fully tighten it.
- Plug in - Attach the power pack with the velcro strips. Plug one USB into the top port and plug the other USB into the bottom port.
- Power up x2 - Remove the back cover by sliding it to the side. Press & hold the power buttons on both the tablet and camera.
- Prep camera to connect - On the camera, press Menu button > Application > Application List > Smart Remote Control
- Connect tablet to wifi - Unlock tablet with 4-digit pin provided. Swipe down from top of screen, tap and hold the wifi icon. Choose your wifi network and connect.
- Open Pixi app and test - Once connected to wifi, tap on the Pixi icon to start the photo booth app. Once it loads, tap the screen to take a test photo.
- Positioning - Now that you're up and running, check your framing and distance. Make sure the kiosk is level and 4'-6' from your backdrop (if using one).
PDF Photo Booth Setup Guide with Pictures
Download a full color pdf of the Base 8MP Photo Booth Setup Guide including pictures for each step.
Click here for PDF
Looking for instructions for our Base 8MP camera? Click here for Base 8MP setup video
For more helpful resources, how tos, and setup guides, check out the Pixilated Resource Library.


